Showing posts with label gifts. Show all posts

Sunday, October 30, 2011

Pumpkin Party

Fall is here and it's the perfect time to get your friends together; have great food and enjoy each others company.

I have what I have so lovingly call "The Party Curse." See I love to entertain and host, but the people I invite either end up going out of town, family matters, or my party coincides with flu season (even my own wedding was sparse!)

Alas, the same thing happened this time. My best friend, her sister, and her daughters came, which was great, but not what I had planned for.

So, here is my party set up to help give ideas if anyone else is thinking of throwing a Pumpkin Party next year. Who knows? Maybe I'll put myself through this again and it will be different.

Pumpkin Party Intimate Get Together 2011


Decorations

I borrowed a long table from my local church and set up two working tables, one for adults/older kids and one for younger kids.

I had a left over tablecloth roll from my sons birthday so I covered all the tables in that. My mom is a teacher so I went to her school and took about 6 feet of orange paper. I cut that to make a runner to go down the middle of the table. Then I had two pumpkin luminaries which I placed pumpkin carving tools inside.


I also had two bowls available for pulp and seeds.


The kids table was my sons work table, covered with table cloth. I set out tempera (washable) paints, brushes, disposable plates and some push in decorations for the non-carving table. 

The backyard so far...


Besides the tables I also made a pumpkin pennant which I posted about here, and these adorable corn husk pom-poms


I got this idea from one of my favorite blogs CentsationalGirl, she gives a good tutorial on her page here.


Food

The party was in the afternoon, so I only served munchie foods.

Dish 1: Apple slices and Pumpkin Dip. 
The apples were served with the cores cut out using a mini cookie cutter. Served alongside with a pumpkin dip. This went the fastest, between my family coming by and munching, I was out of apples and dip :) 
I got about 5-6 slices from each medium fuji apple, then they took a bath in some pineapple juice. I wrapped them up and put them in the fridge a few hours before the party.

Pumpkin dip
8oz cream cheese
1/4 c brown sugar
15 oz pure pumpkin
spices to taste (ginger, cinnamon, cloves)

Cream together ingredients until smooth, place in serving container and chill at least an hour before serving. Also great with gingersnaps, carrot sticks and honey pretzels.


Dish 2: Veggie Tray. Easy. Simple.


I took a wide, clear platter and spread out a 16oz bag of baby carrots. Sliced up some cucumber eyes, a celery stalk for a stem and snap peas arranged in the shape of a mouth.

Dish 3: Pumpkin Empanadas


I made these about 2 weeks ago and just popped them into the freezer. I took them out the night before and they were just as good. I'll post a recipe for these soon.

Dish 4: CROQUEMBOUCHE
or literally, “crunch in the mouth”. This piece is the traditional wedding cake in France, and is often served at baptisms and communions as well. The classic piece montée is a high pyramid/cone made of profiteroles (cream-filled puff pastries) sometimes dipped in chocolate, bound with caramel, and usually decorated with threads of caramel, sugared almonds, chocolate, flowers, or ribbons.

I had been waiting to do something big and fun and DIFFERENT, so I attempted the CROQUEMBOUCHE (I love saying it). I filled mine with a custard, which is traditional for most creme filled desserts, and of course mine had to be pumpkin for my pumpkin party. I found a pretty good recipe here.

I doubled my recipe and made two batches, one of just pumpkin and one of pumpkin-chai (this one is a winner). I'll post a recipe of my adventures in this piece later too.

Snack Table
Games

Because the bulk of the party I figured was going to be for carving pumpkins, I didn't want to go overboard by planning a lot of games. But I did make one easy one, kids of all ages enjoy (even if they say they are too old for those kid games).

Pin the Nose on the Pumpkin


I bought a poster board from the dollar store and cut out a pumpkin from the orange paper I brought home from school. Then out of black card stock I cut out a mouth and eyes then made about 12 noses or so (more or less depending on how many kids are playing). Keep a blindfold or a sleeping mask handy and you're ready to play.

What does the winner get to take home?

This Pumpkin trophy!

Ding! Ding! We have a Winner!

I bought a small fake pumpkin at Micheal's Crafts and carved "Winner" into it, then filled it with candy. I love it. It's a memorable prize and it's a pumpkin!

Because I only had two kids at the party (my son and my friends daughter, both 2 yrs old) I gave my game and prize to my mom who is a teacher so she can use it in her classroom on Halloween.

Goodie Pumpkins

Finally, before everyone leaves, they were to take home a goodie pumpkin basket. I found these babies at a yard sale, I grabbed all 20 for $5!

Each one was to be filled with some candy, a pumpkin scented candle (dollar store) and....


Once everyone gutted their pumpkins and they gave me all their seeds, I was going to wash, dry, spice, and bake them while they carved their pumpkin faces. Then I had some small candy wrappers on hand to wrap them up so everyone could take home a pumpkin treat from their own pumpkin!

I thought it was a nice personal treat. Alas, my friend who did come didn't want her seeds so I still have them. I'll post that recipe later.

At the end of the day, I was tired; but I had this to show for it.


In some small way, it's goofy, smiling face makes me feel better about my "party curse." There is always another holiday or birthday to plan for and get together.


Saturday, October 8, 2011

Pumpkin-Lavendar Bread

I am hosting a Blessings Unlimited party tomorrow and I really wanted to make something different for the guests to nibble on as they look through catalogues and listen to a consultant speak.

The party is going to be outside in the fresh Fall air, making this a perfect time to start with a new pumpkin recipe!

Last night I was sitting and thinking of what to make, when I decided to combine two different but complimentary SMELLS....what goes with pumpkin? The usual: nutmeg, cinnamon, ginger, maple, cloves...but I thought, what about lavender?

That's it! I googled some recipes (I guess I'm not as original as I thought), and found very few, most blogs just used the same recipe over and over, I didn't like that. This had to be an original, so I made up my own.

Pumpkin-Lavender Bread

4 c sugar
1 c oil
4 eggs (you can substitute 4 tbl of flax and 1/2 of water for added fiber)
3 1/2 c all-purpose flour
2 tsp baking soda
1 1/2  salt
1 tsp Saigon cinnamon
1 tsp nutmeg (fresh grated is best)
1/4 c lavender
2/3 c water
1 1/2-2 c pumpkin puree (homemade is best!)
1 c chopped walnuts or raisins (optional)

1. Take a deep small bowl and pour in lavender. If you have a mortal and pestle (I don't), crush lavender until aromatic and sweet. I used a citrus zester and a bowl-same diff. Pour in one cup of the sugar into the lavender and mix. Let sit.
2. Grease 3 8x4x2 inch bread loaf pans, set aside. Pre-heat oven to 350F.
3. In your stand up mixer bowl (or a large mixing bowl), beat remaining sugar (3 c) and oil on medium speed until crumbly. Add eggs one at a time, beating well after each one.
4. In another large bowl, combine flour, baking soda, salt, cinnamon, nutmeg and half a cup of lavender sugar.
5. Alternate adding flour and water to sugar mix on low speed, starting and ending with flour. Mix until just combined. Mix in pumpkin.
6. Spoon batter into prepared pans. Sprinkle with a few lavender buds, and bake for 55-60mins or until toothpick inserted comes out clean.
7. Cool in pans 10 mins, remove and cool on wire racks completely. Eat.

This bread is very good! I loved the mingling of flavors. You take a bite and immediately taste the familiar pumpkin and nutmeg, but then comes the lavender and your senses just go, "ahhhhh". I know I'll be making this again.

* Next time, I probably would add nuts. I made my bread without walnuts (family members are allergic), but I think those would really, really made this bread sing!


The crumb texture is just right!

Tuesday, November 9, 2010

25 days of Christmas: Gifts! #2 Magnets

I know I am not the first person to post this, in fact the news about making your own beaded magnets has been out and about for quite awhile now. But, I wanted to include them in the possible gift category. They are cheap, easy-peasy to make, and can be very personable.
 Things you will need:
Mod Podge (or glue)
Scissors
Clear glass stones ($.89c for 25!)
Magnet roll ($1, cheaper then individual ones)
Pencil
Paintbrush
Newspaper
Scrapbook paper, magazine clippings...(I do not suggest using any photographs, they do not hold up well over time and the colors warp with temperature/chemical changes)

  1. Spread out the newspaper to protect your work surface. Take a stone and place over your paper where there is a nice design that fits into the stone. Trace around the stone lightly and cut out the shape just slightly within the line. I traced one stone 5-10 times on a piece of paper and had very little variation when putting these together, all differences can be trimmed off to fit that particular stone.

Flip your stone over and apply a very small amount of Mod Podge....


Then apply your cut out circle to the back, picture part facing in.


    Check your work and make sure everything looks OK. Use this time to trim the edges of the paper so it is flush against the back of the glass stone. You can also move the paper gently if it is not centered how you would like it.

    Wait about a minute for the glue to set (or longer) and cut a small piece of the magnet off to size. I prefer the magnet roll because it is cheaper and it already has a tacky side that you just peel off and stick. For added security you can hot glue the magnets on, but the adhesive is already really strong.

    And there you have it. Economical and beautiful gifts that fit any budget and style.
    Total cost of each magnet? $.07!


    Use them as a stocking stuffer,
    Gifts to add to homemade cookies and ornaments, 
    Easy gifts to personalize with someones favorite: band, movie, phrase, inside jokes, colors, holidays etc..

    Saturday, November 6, 2010

    25 days of Christmas: Gifts! Homemade Playdough

    Have you ever tried making Homemade Playdough?

    I’ve always heard about how most Preschools always make their own, and my long time friend has been making her own for a long time. I thought this would make a great Christmas gift for little ones ~ it’s so simple, fun, and thrifty!

    Homemade Play-dough Recipe* It is edible!
    • 1 cup Flour
    • 1 cup Water
    • 2 tsp. Cream of Tartar
    • 1/2 cup Salt
    • 1 tbsp. Vegetable Oil
    • Food Coloring/ or Kool-Aid packets (you won't need a scent below if you use Kool-Aid)
    • Vanilla, Orange, Lemon, or Peppermint Extract, Pumpkin Pie Spice...
    1. Mix Together all ingredients except the food coloring in a medium saucepan. You can quarter the recipe and make four different colors of play-dough!
    2. Cook over medium heat, stirring constantly. As soon as the mixture begins to thicken, add in food coloring, mix thoroughly. Mixture will quickly begin clumping and form a solid.
    3. Remove pan from heat to cool, then remove play-dough to cool on wax paper, etc.
    4. Store in freezer ziploc bag and in freezer. Play-dough will keep for years if you want it too.  
    Giving the Gift: Package the play-dough in clean baby food jars/plastic containers (anything airtight really). Paint the lids or make wrappers from stickers to place on the side. Make sure you make a tag to go long with your gift to remind the kids to place the play-dough back in the freezer or it will dry out. If it starts to get dry after several weeks, add a few drops of water and work into play dough to extend it’s shelf life.

    Include some dollar store cookie cutters too for some added fun!
    • Great stocking stuffers'
    • Easy toy to have on hand for kids at Christmas parties or drop in guests

    Friday, October 8, 2010

    Spice Shortbread Sticks (try saying that 5x fast!)

    I found the recipe for these cookies in an old Pillsbury Cookies and Bars book I found at my moms. I thought I would try them out, I haven't made these before and look yummy. I was in an Autumn type of mood and wanted something warm and "dunkable" for my morning coffee or apple cider.

    I don't post everything I make, especially if I didn't make it up, but these were so darn good and easy I had to share. They are really like a comfort food to me, I eat one bite and I feel all warm and cozy.
    These are great mailed Christmas cookies

    Sugar and Spice Shortbread Sticks
    This recipe has been modified to suit my baking process

    Cookies
    3/4c brown sugar
    1 c unsalted butter, softened
    1 tsp vanilla
    1 egg
    2 3/4 c all purpose flour
    3/4 tsp apple pie spice (OR 1/2 tsp of cinnamon, 1/8 tsp each of ground cloves and nutmeg)
    Haha, looks professional and wasn't even staged!

    1. In a large bowl, combine sugar and butter, cream. Add vanilla and the egg, mix until light and fluffy. Add flour and spices, mix until a dough forms. Wrap in plastic wrap; refrigerate about an hour.
    2. Pre-heat oven to 350F. Take a piece of wax paper and lay on a flat surface, lightly flour. Cut dough in half and roll out on half to a 12x6- inch rectangle. Use a 1-inch ruler, and rock slightly to the right to make impressions in the dough all the way across. Cut the dough down the impression lines with the back of a knife. (Cut the cookies in half lengthwise to get 3-inch cookies instead of 6-inches if you'd like) 
    3. For a well shaped stick, use the flat side of the ruler to straighten the sides of the dough. Use it as a guide to cut the rectangle neatly, in half, or to make sharp edges. Dip a spatula in flour and carefully place sticks 1/2 inch apart on ungreased cookie sheet.
    4. Bake for 12-15 mins or until edges or slightly light golden brown. Immediately remove from cookie sheet and cool on wire racks completely. 
    Glaze
    1 1/2 c powdered sugar
    1/4 tsp cinnamon, 1/16 both cloves and nutmeg, 1/2 tsp chai vanilla spice (optional)
    3 tbl apple juice or water

    1. When cookies are completely cooled. Blend all glaze ingredients together until smooth and you reach a desired glaze consistency (runny, think like molasses). Spread glaze on tops of cookies. Let glaze stand and set before storing.
    This is cleaned out candle jar

    Sunday, September 5, 2010

    Activity Board (Part One) Chalkboard Paint

    I bought a table at IKEA, and it served me well. But months of putting to many heavy things on the table, dragging it around and I ended up Oops! breaking the cheap tables legs. 

    I tried to fix the problems, but I had to face facts and give up on it continuing to being a table. 

    BUT, that doesn't mean it can live on to be something else :)

    My $20 table, farewell!


    I took the table apart and kept everything. But the part I'm focusing on is the second shelf. It's solid, large piece of wood: 46"x26 1/2"

     
    A can of chalkboard paint sprayed to one side, and a few hours later....I have a HUGE chalkboard for my son to play with.

    I think he likes it.

    Messy Feet!


    There are a lot of options now a days when painting an activity board or message board for the house.

    • Chalkboard paint comes in different colors, you can have it made for you or buy the kits and mix it at home. I've always love the classic black. Plus the left over paint be used in other places in the house.

    Check out Frugal with a Flourish's 9 Ways to Use Chalkboard Paint. I love the gardening spoons!

    • I could and (now that I think about it) SHOULD have painted magnetic paint on the board before I painted the chalkboard paint so it would have doubled as a work board.

    • There is whiteboard paint, but I don't trust anyone under the age of 10 with markers :)

    I won't tell you what I'm doing on the other side of the board, but you're welcome to guess what it is.

    Wednesday, August 11, 2010

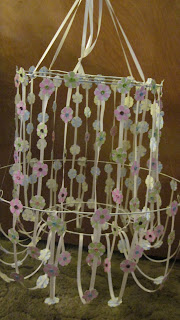
    Paper Flower Chandelier

    In the beginning of my adventures in Blogland, I became hooked on Living with Lindsey. One of the first things I loved about her blog was her "thriftiness" and creativity in not letting things get in her way. She saw this chandelier at Pottery Barn (and who honestly doesn't love PB's style?) and was inspired, but couldn't think of a reasonable excuse for paying the Pottery Barn prices.

    Instead, she got her craft on and she made this! Isn't it beautiful?!Lindsey did all the hard work for me, and I couldn't resist wanting to make one. I made my version of the chandelier for my friends little girl.

    Click on the link above to follow her tutorial or read ahead for mine that is a little different.

    For this project you will need:
    • 18" wire box wreath
    • 12" wire box wreath
    • 2 wire coat hangers
    • floral wire
    • Heavy gauge wire cutters
    • Needle nose pliers
    • Fishing line
    • Sandpaper
    • Spray paint
    • ribbon (mine was 1/4", 3 rolls)
    • Glue gun and sticks
    • Elmer's glue
    • Scissors
    • Scrapbook paper (mine was 12x12, 1 sheet for each color)
    • Paper punch (medium)
    • Small buttons
    • I found all my supplies at Micheal's Crafts
    My friends daughter is very girly, and she wanted something that would fit with the decor of the nursery she already has (pink and green). Knowing that, I picked a nice "girly" paper punch she could still grow into and lots of scrapbook paper. *I found a whole book for $9.99 before my 40% off coupon so my friend could pick the perfect pattern and colors for the chandelier. I get to used the rest of the paper for another project :)

    1. Start by stamping out your shape.

    I wanted contrasting colors and texture with these flowers so I had one flower stamped out with pink polka dots over green stripes, and the other flower of small pink stripes and green polka dots. The patterns are subtle, but work great together.
    2. I used the Elmer's glue to put them together and finished off the flower with a cute button. I also slightly bent up the top flower petals so they stuck out more and added detail.
    Now repeat the process 225 times! That's approximately 111 paired flowers of each color! I think this took me about 2 hours total to cut, glue and curl all of them.
    Now comes the hard part...Lindsey made her frame for the chandelier (brilliantly if I may say so, and it's my blog so I will!).

    And the frame was easy to make.... and then not to easy.

    I used floral wire box wreaths because if you unbend the hooks and snap the connecting wires, you get 8 wire rings for less then 3 macrame rings! This was also much, much easier to find, since every store I went to didn't even have macrame rings.
    3. Unbend the hooks on the 18" ring and remove the larger outer ring. Then remove the hooks to your 12" wreath and remove the larger outer ring and the innermost ring. Keep the remaining wreath rings for another project.
    You should end up with an 18" ring, a 12" ring and a 9" ring.

    Now, pull out your hangers and wire cutters.
    4. Place the hanger over the 12" ring and measure about an inch over the sides and mark. Cut the hanger to size. If you use needle nose pliers you can unbend/unwind the hangers and straighten them out to get the most out of your materials. This requires a lot of arm muscle! You need two wires cut for the 12" ring and the 9" ring.

    5. Once the hanger is cut to size, use the pliers to bend the wire to a tight hook over the edge so they won't move. Repeat and make an overlapping "X" shape for each ring. This steps helps to assure the rings will keep their shape.
    6. Next, move on to the floral wire. Take the 18" ring and twist a small "U" shape (no bigger then your fingernail). Wrap the ends a few times around the ring to secure into place. I used the needle nose pliers to squeeze the wires together and down to hug to rings.
    I placed these evenly around the ring using a ruler to keep them straight.

    Rough up your rings a little with some sandpaper to prep them for painting.

    7. Take your rings outside and spray paint them.

    I'm not a big fan of spray paint. I sprayed my rings white and did sort of a bad job of it, but it actually works out by giving it an antique look :) Saves me the trouble of scrubbing it with sandpaper after! Once the rings are dry, bring them inside and set up an area to work in that will hold up your chandelier. I used two antique sewing machines and a yard stick. Lindsey used two step ladders and a yard stick. Really up to what works best for you :)

    This is the frustrating part. Connecting the rings and making the frame.

    8. I started by cutting 4 pieces of fishing line 12" to give me room to shorten (easier to cut more and take away then cutting new strings). Loop the string through one of the hooks on the medium ring and tie. Then connect the fishing line to the small loops you made on the larger ring. Repeat for all four hooks and loops, ensuring that the rings hang evenly from each other. I tried using a level to help...it didn't help lol. In the end the Medium=>Large fishing line was 8 1/2 inches when done.

    9. Hang the smallest ring next, connected to the larger ring. I looped my fishing line through the small cracks in the wrapped around wire "loops". I started with 10" this time and through trial and error, the Large=>Small fishing line ended up being 6"
    Again. Make sure they hang evenly. I continued to play with this until the end, it was driving me crazy to reach perfection!

    *I had a "DUH" moment through my frustration. Does this shape of the frame look familiar to you? Beside the uncanny resemblance to a UFO! It looks like a lampshade! Next time I try this project, I'm going yard saleing and find a cheap lamp to strip of its fabric and (in theory) instant, stress free frame!

    Yay! Now the frame is built and it's smooth sailing all the way....

    10. Now is the time to place on the ribbon. Grab your ribbon and plug in your glue gun to warm up while you mark the rings. I went around the Medium ring first and marked every 3 inches *to make things easier and I'm not second guessing myself if the ribbon is spaced evenly apart. I did the same thing to the Large ring.
    11. The chandelier top is made up of alternating hanging ribbons and looped ribbons that connect with the smaller ring (see below for example). Test your ribbon and see how low you want it to hang. I let mine fall just a bit for the rounded look. I then cut my hanging ribbon to stop just above the "curve" of my looped ribbon. Count the marks and cut half of the ribbon to "hanging" size and then the other half "loop" size.

    My ribbon was cut 8 1/2 inches long.
    12. Using your glue gun, place a little bit of glue on one end and wrap over the edge of the marks you made. Then use a little hot glue and wrap the other end around to the small ring. It really makes no difference where you place the other end on the small ring. For the hanging ribbon, just glue to the Medium (top) ring and let the other end hang!

    13. For the second level of the chandelier, the ribbon will loop from the large ring to the small ring; test and see how you want it to loop. The entire bottom half of the chandelier is all loops, not hanging and loops like the tops half. I didn't want the ribbon to hang too low. About 2 inches below the upper loops looked best to me.

    I cut my bottom level ribbon about 15" long. Hot glue like the upper level over the marks pre-made.
    14. Now turn to your punched paper cutouts. I very lightly marked one upper level ribbon every 3 inches with a dot. Then I hot glued the cutouts to the ribbon alternating the colors. The next ribbon I just "eyed" it and alternated the colors again. By then I had a pattern and went from there.

    Continue all the way around the upper level. I did the same process for the lower level.

    15. Finish off the chandelier with the remaining ribbon and tie a hanger from each of the top corner hooks.In the end...Ta Da! *Sorry for the bad picture, not nearly as beautiful as Lindseys!

    I am really proud of this project and even though it is a lot a work, I could see myself doing this again. It is definitely a great gift for kids,(more for mommies then for the kids) being fun and specifically hot glued to be unique just for them.

    I want to make one with stars for my sons room just to hang as decoration.

    I think I'll try painting the paper with a glow in the dark paint, so when the lights go out, he can still enjoy it :)

    And Now.....Drum roll! Was it worth it all?


    Pottery Barn's Chandelier: $80.00+shipping


    Total cost of My Chandelier project: $40.00
    !

    WIN!

    Sunday, July 25, 2010

    Beautiful Book Wreath

    Ok folks, this is totally not my idea. In fact the person I stole this craft from stole it from someone else! But look at this thing...it's BEAUTIFUL!

    I call it my Living with Lindsay wreath.
    Head over to her website and see the full tutorial and even a video of the techniques she used. Simple-simple to make and it looks so sophisticated.


    I just love the ripples and curves of paper all over.

    This is also a great recycling craft to make. Before your going to throw out that old, worn book away; consider making this beautiful wreath for a friend or family.

    Happy crafting!