Showing posts with label Indian. Show all posts

Sunday, July 29, 2012

Spinach and Pistachio Kofta

A crunchy take on the soft and tender fried paneer. This is a classic recipe that I have seen many bloggers retell since there is not much to the recipe. 

I added spinach since paneer is a cheese and I LOVE spinach and cheese combinations. 

And, I added Pistachios after I saw a few bloggers adding ground almonds and peanuts to their recipes. I figured pistachios are a soft nut like the other two and it sounded right together with cheese and spinach.


The combination of all three ingredients went so well together. The gravy was rich and the added crunch of the pistachios with the soft paneer was simply sublime.

I am so happy with this recipe. Not only is it filling, but it's healthy too!

I am most pleased because this recipe leaves a lot of room to come back and play with different flavor combinations to make another (different), healthy dinner, delicious.


Spinach and Pistachio Koftas                                       Serves 4

For Koftas

1 package of paneer, crumbled
1/2 c frozen spinach, thawed and squeezed dry
2 tbl finely chopped pistachios
1/4 tsp turmeric powder
1 tsp cumin seeds
1 tsp coriander powder
1/2 tsp Kitchen King
1/2 tsp garam masala
2 tbl flour
2 tbl fine breadcrumbs (optional)
Oil for frying


1. Crumble the paneer on a wide plate, top with remaining ingredients, except breadcrumbs and oil; mix until combined.

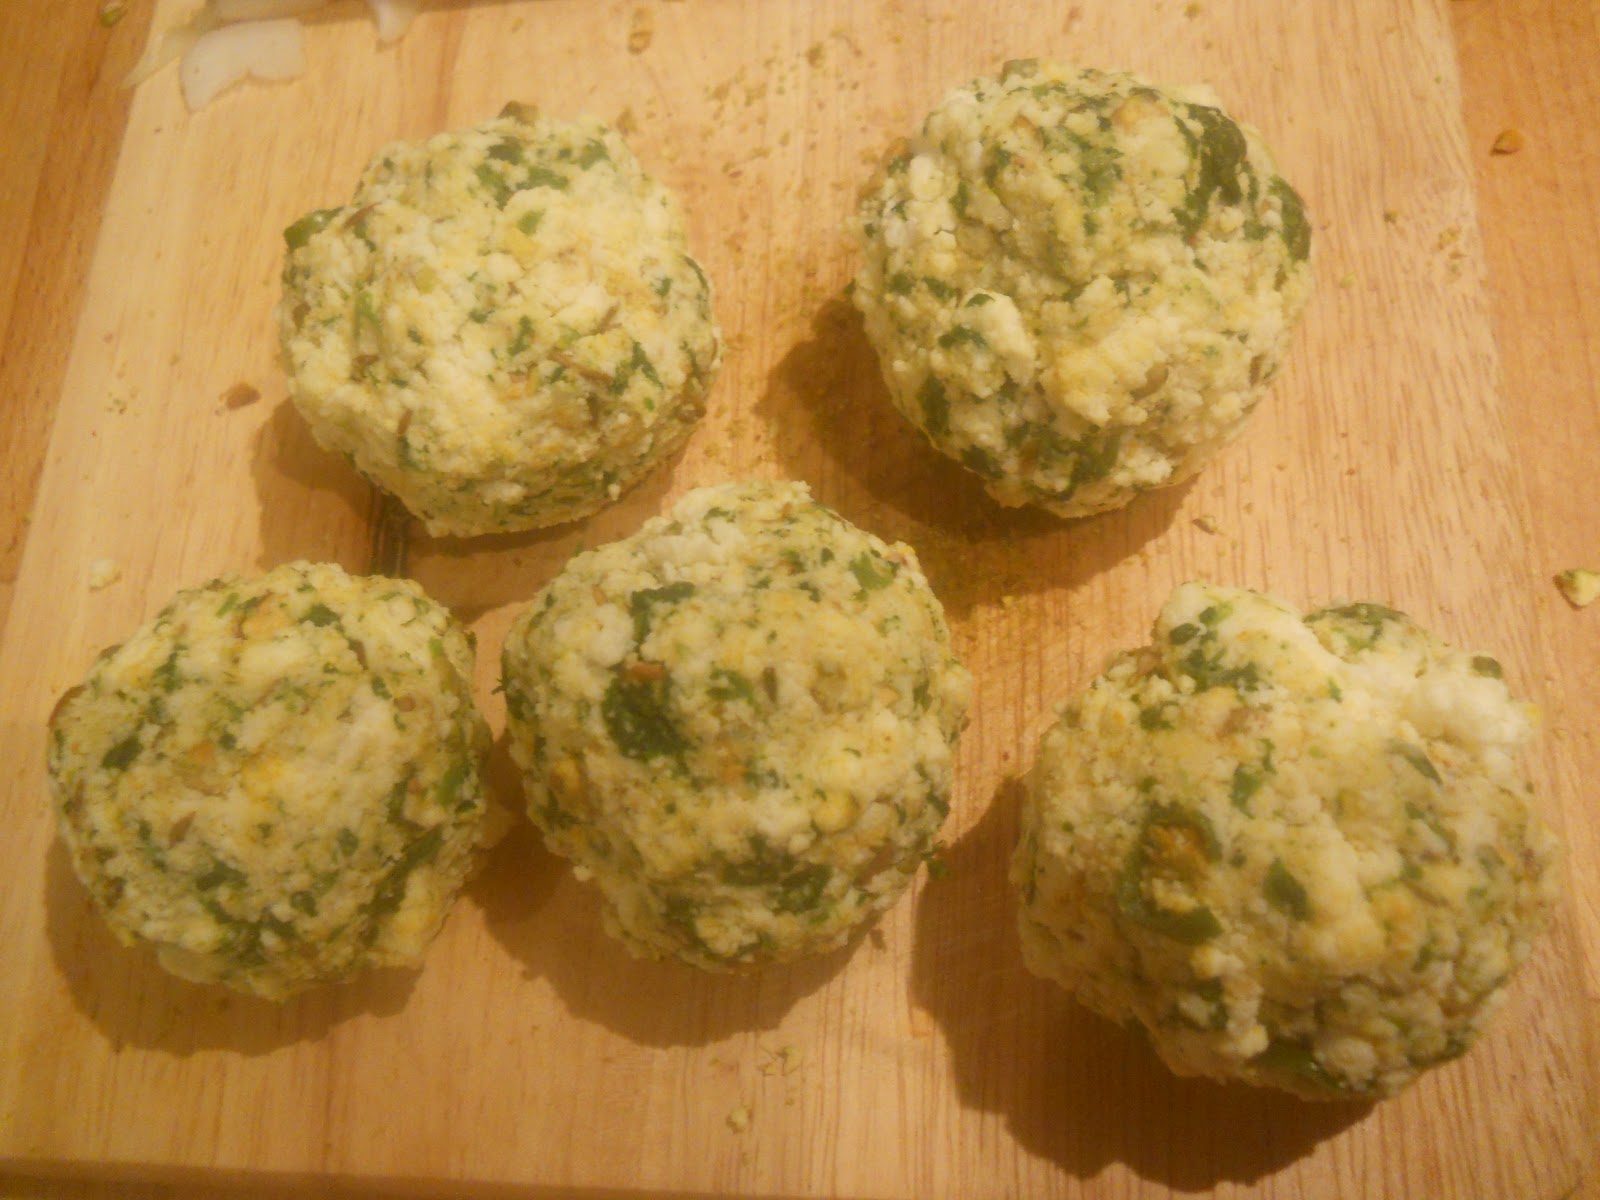
2. Take a handful of mix at a time and create 5-8 balls, formed tightly. Roll in breadcrumbs if desired.  As I tried both techniques, breadcrumbs and without, and the balls tasted the same either way. The only difference is, the ones coated in crumbs were much more uniform in color.


3. Heat up a wok or fryer and deep fry koftas for 5-8 minutes or until golden brown. Drain on a paper towel.  


For Curry

2 tbls oil Oil
3 whole cloves
1/2 tsp ground cinnamon or 1 in stick
1 tsp cumin seeds
3 cloves garlic, minced fine
1 onion, chopped
1/2 can chopped tomatoes or 2 whole tomatoes chopped
1 tbl salt
1/4 tsp turmeric
1/2 tsp red chilli powder
1 tsp coriander powder
1 tsp Kitchen king
1/2 tsp Garam masala
3/4 c milk (I used 1% fat) 
1 tbl chopped pistachios (Garnish)

1. In a wide saute pan, heat up the oil and add the cumin seeds, cloves and cinnamon, let cook on medium until aromatic and cumin seeds begin to pop. 

2. Fry the onion and garlic until onions are tender and slightly brown. Coat well with the sweet spices.

3. Add the tomatoes and the remaining spices; mix well. Let vegetables cook for 5 minutes or until tomatoes fall apart. 

4. Slowly add the milk to the curry until thoroughly mixed. Add the fried koftas, coat in the curry sauce; cover and let simmer on low for 10 minutes. Curry will thicken quickly, add more milk to reach desired consistency. 


5. Serve koftas and curry over herbed rice, garnish with chopped pistachios. 

Calories calculated using Sparkrecipes calculator: 158.5 calories per serving. This count does not include calories included if eaten with rice or oil absorbed while frying. The calculation was also made with the assumption the reader is using breadcrumbs.

Saturday, July 28, 2012

Aloo Paratha Wrapped Lamb Rolls

This post is inspired by a myriad of blogs I was reading today. I wanted to make something different with my lamb shoulder. Not lamb curry...not Moroccan lamb..etc, we've all seen those posts. I wanted something...international but what?

I searched around and behold; this wonderful video by Chef Mark Miller. A yummy, beautiful Lamb Wrapped in a Pueblo Flat bread.

It sounded delicious, but I didn't have all the ingredients he required. You chefs!

Here is my version of Mark's lamb recipe IDEA, but instead of a soft flat bread, I made a : potato stuffed, pan fried, flat bread- also known popularly as aloo paratha.

The aloo paratha wrapped lamb was simply delicious. I will be making this again. It turned out perfect and was very filling, with a crunchy outer layer and tender spiced lamb inside. Perfect for taking on a picnic or a garden party where everyone is outside. 


Aloo Paratha Wrapped Lamb Rolls
                                                             
                                                                                   Serves 4
                                                                                   Time: 3 hours

Lamb

1-2 lb Lamb Shoulder, loin, or boneless chops; fat trimmed, sliced into 4 rounds
1/2 lemon, juice
3 garlic cloves, sliced
1 tsp cumin seeds
1 tsp ground coriander
1/2 tsp chili powder
1 tsp honey
1 tbl olive oil
salt and pepper

1. Pre-heat the oven to 450F/230C. Trim as much fat from the lamb as possible. Lamb fat is 'gamey' and doesn't do much to add flavor so you are better off with a nice lean cut of meat. Cut it into 1.25cm thick rounds.


2. Measure a sheet of aluminum foil large enough to wrap lamb slices and place in a roasting tin. Arrange the pieces of meat in the center of the foil.

3. Next, using the tip of a sharp knife, make incisions in the lamb and insert the pieces of sliced garlic, distributing them as evenly as possible. Make a paste out of the remaining ingredients and rub all over lamb slices.


4. Let sit for 30 minutes to marinate. Roast lamb for 30 minutes or until a crust forms. Fold up the foil to make a parcel, place the roasting pan back in the oven and cook at 300F/150C for 1-2 hours.

Begin making Aloo Paratha a half hour before ready to serve.

Filling

1 large boiled potato, peeled and mashed
1/2 onion, shredded
1/4 c coriander leaves
1/2 tsp chili powder
1 tsp ground cumin
1/2 tsp salt
Other half of lemon, juice

1. Mix the mashed potato, onion, spices and lemon until combined.


Paratha Dough

2 c flour
1 tsp salt
1/4 tsp paprika
1/4 tsp chili powder
1/4 tsp pepper 
water as needed
2 tbl butter or oil

1. Mix the flour and spices evenly with a whisk, add water slowly, mixing as you go until a dough forms. Knead the dough with your fist until it becomes soft, about 6 turns or 5 minutes.

Assembling Aloo Paratha Lamb Rolls

1. Remove cooked lamb from the oven, set aside on a rack for 5 minutes to cool and juices to drain off. Divide the Paratha dough into eight balls. Roll each ball one at a time, into a 1/4 in thick circle. 


2. Add some of the potato mixture and top with another rolled circle. Sprinkle with more flour and roll the sandwiched dough very thin, enough where you can see the filling slightly through the dough; careful not to break the 'skin' as I did in this pic.


3. Fold each lamb slice in the dough, and fold gently underneath to hide the seams. 

Prepared Lamb rolls

4. Heat a skillet with 2 tablespoons of butter on medium-low heat. Place the lamb rolls seam side down first and cook until dough becomes deep golden brown, flip and cook again until crispy and brown. This is not like original parathas because you will only be cooking one side of the dough, so you have to make sure the outside is cooked low and long enough to cook the dough inside touching the lamb. Sorry no pic of this step. 

5. Serve lamb rolls with a simple red onion salad and yogurt sprinkled with salt and pepper.  


Calories calculated using Sparkrecipes calculator: 568.8 Calories per serving.


Sunday, July 15, 2012

Leek and Chickpea Curry

I have never had leeks before. I bought them just for that fact. 

If YOU have never had leeks before, then I think you will be pleasantly surprised at their taste and, in this curry. You never can go wrong making a curry out of the vegetables you have on hand.

The flavors meld. They compliment.

If you are thinking 'curry,' that must be spicy! It's only as spicy as you want it to be. I like things with a good kick, but also have deep flavors that keep your tongue busy with each bite as it recognizes all the spices you add. A curry combines these two food loves in one.

Curry doesn't mean just spicy. It means a lot of things. But, as it was explained to me, curry usually is defined as anything cooked with water. Read this interesting wiki definition if you want to get some more ideas. Think about it this way. If you like to curl up with a warm bowl of soup on a chilly day, a curry gives you just that.

This will be my first of many curries I hope to post on this blog. I won't post about regular curries; that you can Google, but the ones I put my own spin on.


Leek and Chickpea Curry                                        serves 4


2 tbl vegetable oil or ghee
1 onion, diced
3 cloves garlic, chopped
1 in ginger, peeled and chopped
2 leeks, trimmed. Here is a helpful video how to prepare leeks for us beginners
2 c cooked chickpeas, 1 can
1 medium potato, peeled and cubed
1 tsp EACH ground cumin, ground coriander, salt, garam masala, tumeric
1 tbl EACH chili powder, Kitchen King (available in Indian, Punjabi, Pakistani stores)- KK is optional
1/2 can chopped tomatoes
1/2 can coconut milk
water 
coriander/cilantro, fresh, chopped

1. In a saute pan, heat the oil and on low saute onion, garlic, ginger and leeks for 5 minutes, letting leeks and onions sweat.
2. When leeks and onions are tender, add all the spices listed, mix well and let cook another 5 minutes.
3. Add chopped potato, tomatoes, coconut milk and one cup of water. Mix well. Bring to a boil and let simmer on low for 30 minutes, stirring occasionally and adding more water if necessary.
4. Garnish with fresh coriander, serve with wheat tortillas, wheat pita bread or rice.

Calories calculated with Sparkrecipes calculator: 241 calories per serving. *Does not include calories of anything served alongside (tortilla/rice)


Monday, November 14, 2011

Black-eyed Beans and Potato Curry

Some nights you just need to experiment and hopefully you come out with a winning dish.

Meals start with inspiration. Tonight I looked around and I saw my collection of beans sitting prettily in their jars, and I said: "I want something with black-eyed beans" and thus this creation happened. It only takes one thought and some steps to make what you want a reality.

I really enjoyed this meal. It was very good and very filling. You can't go wrong with low in fat, high in flavor meals that feed a family and takes little to no effort to make.

November is a big month of National Health Associations trying to bring awareness to different causes. I take it as a challenge to create, healthy dishes I can be guilt free to eat. October was Unprocessed month. November follows through with overall health awareness.

So enjoy this meal with good healthy thoughts and a nice, satisfied tummy.


Black-eyed Beans and Potato Curry

1 extra large potato, cubed
1 cup, black-eyed beans/black-eyed peas
2 medium tomatoes, finely chopped
1/2 medium onion, finely chopped
4-5 garlic cloves, finely chopped
2 chilis or 2 jalapenos, seeded and diced
2 tsp cumin seeds
2 bay leaves or 1/2 tsp crushed leaves
1 tsp garam masala
1/4 tsp turmeric powder
9-10 mint leaves, chopped (optional)
salt

Beforehand to speed up the cooking process, quick soak the beans. In a pot, place your beans and 6 cups of water. Cover, and just as water is boiling, turn down the heat to simmer for 10 minutes. Turn off the heat and let sit for an hour. Drain and prepare as directed below.
1. Heat oil in a  heavy bottomed pan and add potatoes. Fry until brown on most sides, remove from pan and set aside.

2. Add 2 tbl of oil and add cumin seeds, when they start to make a cracking noise, add the bay leaves, chopped onions and fry until tender.

3. Lower the heat. Add the garlic, chili's/jalapenos, turmeric powder, garam masala.

4. Add the chopped tomatoes and fry until the oil separates.

5. Add the beans and cooked potatoes, add water to cover the beans and cook for 40-50 minutes (or 10-25 mins of you quick soaked your beans).

6. Uncover and add the chopped mint leaves and simmer for another 5-10 minutes, depending on how well cooked the beans are. Add water if required. If you find there is too much water, then uncover and let boil until the amount of water has decreased.

7. Sprinkle with salt and enjoy.


Calories calculated using Sparkrecipes Calculator: 135 calories per serving

Friday, October 14, 2011

Homemade Paneer

Continuing with my Indian cuisine curiosity, I was kind of interested in paneer. The stuff seemed to be every dish, what is that stuff? Now, mind you, I have never even eaten at an Indian restaurant, so I am finding these things out all on my own.

Paneer is a fresh cheese that doesn't require aging and doesn't melt! Reminds me of Mexican Queso Blanco (yum!), Now that I'm familiar with.

Apparently, Paneer...is very common and so simple, that I figured I could make this stuff at home. Looking for a recipe, I did short research and you only need two ingredients! What? A protein substitute with two ingredients?

Fabulous!

I made my paneer today and will use it tomorrow, recipe to follow!

Also, if you haven't noticed on my blog, I have taken the October Unprocessed Pledge. I pledged to not prepare any meals with processed foods. Check it out here and take the pledge too, it's never too late!

Here we go...

Paneer            Serves: 2

8 c whole, 2% or 1% milk (higher milk fat means more curds)
Juice from one lemon or lime (2 tbl)

Tools:
Sauce pan AND heavy bottomed pan
thin clean cloth or cheesecloth
tall pitcher or bowl
wooden spoon


1. Grab a wide, big pot and pour in your milk. Heat until hot, but not boiling.


2. Add your juice and stir just a little, you should see right away some curdling (that means the acid is working). Let milk continue to cook on med for about 10 mins. Don't over stir your milk, just check it every few mins to move your curds to the side.

3. Once the curds separate from the whey (the liquid remaining after milk has been curdled), the whey should turn a slightly green tinged color.

I was surprised how little cheese you get out 4 cups of milk! But again, you just want the curds, the milk fat for your cheese.

4. Place your cloth/cheesecloth in a colander or bowl, making sure corners are hanging over the edges; pour curds and whey into cheesecloth. Grab corners and tie together. Lift and let hang inside a pitcher to drain about 5 mins, press out whey.


5. Move your paneer and place on a flat surface, place a heavy bottomed pan on top and let sit for another 5-10mins. This will help set the cheese to stay firm so you can slice or cube it later. If needed, squeeze any more remaining whey.

I had to squeeze more out

6. Mine made about 1-2 cups. Refrigerate until needed or just enjoy.


Servings: You can fry it, kabob it, bake it, eat it fresh, crumble it on top of dishes, salads...this cheese works hard to be useful, frugal and good for you!

To many, this cheese is a lot like Greek feta. If you hate feta (Like I DO): because it's bitter and just gross; you will like Paneer. It's neutral and reminds me somewhat of tofu, just waiting to soak up flavors of any dish you add it too.

Brinjal Potato and Eggplant Masala

I recently have been really interested in cooking Indian food. I was amazed the first time I made something, how these spices, and they use a lot of them, (most I have never used before) made these incredible, FLAVORFUL dishes! That are also a no-brainer healthy for you.

I also love that they are adaptable to make them veggie or not.

This recipe is for the heat weak (no chili's) and veggie :) Since we all need more veggies in our lives. Inspration came from a series of recipes, so this is just what I came up with.


Brinjal Potato and Eggplant Masala

1 med eggplant, peeled and cubed 1 in
5 med potatoes, peeled and cubed 1 in
1/2 large yellow onion, chopped
If you have to have chili's (3 green)
2 tbl olive oil
1 tsp cloves
1 tsp cumin
1 tsp cardamom
1 tsp coriander
1/4 tsp Tumeric
3 cloves garlic, finely minced ( or 1 tbl garlic paste)
1 inch ginger root, finely minced (or 1 tbl ginger paste)

1. Heat a wide, deep skillet with oil, add spices (cloves-coriander) and stir until you can smell them. If using cumin seeds, add those first until you hear them pop, then add the rest.

2. Add onion (and if using chili's), sautee until translucent. Add eggplant and potatoes, mix and coat with spices. Cook for about 5 mins, stirring occassionally to prevent vegetables from sticking.

3. Add garlic, ginger, and tumeric, mix well to coat all veggies. Cover and cook until potatoes are tender but firm (you don't want mashed potatoes). Stir occassionally. Approximate cooking time, about 15-20mins.

spices on my oven, :)

4. Serve over rice sprinkled with a little bit of lemon juice and cilantro, or as a side dish to chicken, (yum!)


Using Sparkrecipes calculator: Calories per serving: 220 not including if served with rice, chicken or naan.

Overal Assessment: Pot was scraped clean! Dinner was a success.

Thursday, October 13, 2011

Indian Beans

I don't know why this is called Indian Beans. I did some research online and it took me all over the place looking at Middle Eastern, Native American, Northern Indian, Southern Indian, South Asia Indian, and even the Cleveland Indians! All were different, none with exactly the same ingredients....so, I'll just leave it as is.

All I know is it looked like baked beans. I wanted to eat something with beans and it was easy. After eating it, found out it's delicious and very filling! Yum!


Indian Beans              Serves 10

1 c Pinto beans; dried
1 c Kidney beans, dried
2 qt Water
2 Roma or small Tomatoes
1/2 lg Onion; chopped
4 slices Bacon; cut in 2" pieces
1/4 c Celery; sliced
1-2 ts Salt
3 tb Sugar
1-1 1/2 tb Vinegar
Small corn tortillas
Mozzarella cheese

1.Wash beans; place in 3 qt. kettle with 2 qts. water and bring to a simmer. Cover; cook 2 1/2-3 hours, or until tender. Drain and place in a 2 quart baking/casserole dish.

2. Mix remaining ingredients with beans; cover and bake at 350F  1 to 2 hours or until done. Remove beans from oven, stir.

3. Using a flat pan, turn on stove top to medium and heat tortilla until soft, flipping once. Sprinkle cheese on tortilla and let melt slightly. Top with beans.

4. Enjoy.

Calories are about 228 per serving, figured using Spark recipes calculator

Monday, October 10, 2011

Whole Roasted Tandoori Chicken

Last year I made tandoori chicken for the first time, not ever trying it before. I made it into tacos! Believe me, it won me over fast. It was easy, it was FLAVORFUL, and since that meal I had been interested in the playfulness that spices have on one another.

I have recently gotten into the habit of roasting a chicken every week. That's right, every week (or every other week)! It is a very easy and frugal practice to have if you enjoy chicken as much as I do.

I mean think about it; you get a great meal, chicken stock from the bones and you have pre-cooked shredded chicken on hand at all times for salads, quesadillas etc... I love it.

This week after a little spice shopping spree, I decided to go a little non-traditional and roast a whole chicken in a tandoori marinade. When I say non-traditional, I mean tandoori is usually served as cut up pieces of chicken and can be fiery hot and red to show it.

I'm a bit of a weakling when it comes to heat in my food, I like it spicy, but not painful! So this recipe is adjustable to your tastes. I hope you enjoy it as much as I did.

Whole Roasted Tandoori Chicken

1 2-3lb whole roasting chicken, skin and visible fat removed (or 4 skinless chicken breasts)
1 Tbl Lemon Juice
1/3 teaspoon salt
1/2 cup plain non-fat yogurt (NOT vanilla!)
1/4 teaspoon turmeric
2 tsp cumin powder
2 tsp coriander powder
1/2 tsp black pepper
1/2 tsp chili powder
3 cloves garlic, minced
1 inch fresh ginger, minced
1/4 a bunch of minced fresh cilantro

Optional: cayenne or minced hot peppers to taste

Instructions:

1. Remove the skin and visible fat from your chicken. This is a bit time consuming (15mins?), but very easy to do at home. Cut several deep slashes into the fleshy parts of the chicken.

2. Rub the chicken all over with the lemon juice, making sure to rub into the slashes. Then rub with salt, again, getting it into the gashes. Let the chicken sit, while you prepare the marinade. Wash your hands with "hot as you can stand" water and soap after each time you touch your chicken to prevent the spreading of germs!


3. Get out a pot big enough to place the chicken in, line the pot with two pieces of foil. For the marinade, beat the yogurt with a fork until it's silky, then stir in all the dry, powdered spices. Stir in the minced ginger, minced garlic and cilantro. Slather the chicken with marinade, making sure to get plenty of the marinade in the slashes.
I did not add chili power to this mix
4. Move the marinaded chicken into the prepared pot, loosely wrapping foil over chicken. Secure a tight fitting lid on the pot and place in the refrigerator. The pot and lid are necessary tools to prevent the spreading of salmonella into your other foods in the fridge. Let chicken marinate overnight or 30 mins.
Go all the way, OVERNIGHT! I have been making a lot of chicken's recently and I have found that if you marinate overnight, the chicken always, without fail, comes out amazingly moist and delicious. Plus, I enjoy this recipe because you have dinner all ready to go, just pop in the oven and your done! I can see this a good small party food...? More time for your guests.


5. Two hours before dinner...Take out a roasting pan and set oven to 375F. Lift chicken out of pot and place into roasting pan (you can line the pan with fresh aluminum). Bake uncovered for 1-1/2 hour.
Just before placing in the oven I sprinkled the chili powder on the skin.


6. After a time, check chicken to see if cooked thoroughly. Remove from oven and wrap foil from pan around chicken (or create a foil tent from another piece), and let mean rest for 20 mins before carving. This is a good time to start your rice or veggies.

I don't carve well. I love you can see the gashes!
7. Serve with hot rice and veggies (even better vegetable Biryani) and naan or homemade dinner rolls.

The leftovers (if there are any) are wonderful as sandwiches or wraps, with a little bit of sauce drizzled on top.