In the beginning of my adventures in Blogland, I became hooked on
Living with Lindsey. One of the first things I loved about her blog was her "thriftiness" and creativity in not letting things get in her way. She saw this chandelier at
Pottery Barn (and who honestly doesn't love PB's style?) and was inspired, but couldn't think of a reasonable excuse for paying the
Pottery Barn prices.

Instead, she got her craft on and she made this! Isn't it beautiful?!

Lindsey did all the hard work for me, and I couldn't resist wanting to make one. I made my version of the chandelier for my friends little girl.
Click on the link above to follow her tutorial or read ahead for mine that is a little different.
For this project you will need:- 18" wire box wreath
- 12" wire box wreath
- 2 wire coat hangers
- floral wire
- Heavy gauge wire cutters
- Needle nose pliers
- Fishing line
- Sandpaper
- Spray paint
- ribbon (mine was 1/4", 3 rolls)
- Glue gun and sticks
- Elmer's glue
- Scissors
- Scrapbook paper (mine was 12x12, 1 sheet for each color)
- Paper punch (medium)
- Small buttons
- I found all my supplies at Micheal's Crafts
My friends daughter is very girly, and she wanted something that would fit with the decor of the nursery she already has (pink and green). Knowing that, I picked a nice "girly" paper punch she could still grow into and lots of scrapbook paper.
*I found a whole book for $9.99 before my 40% off coupon so my friend could pick the perfect pattern and colors for the chandelier. I get to used the rest of the paper for another project :)1. Start by stamping out your shape.
I wanted contrasting colors and texture with these flowers so I had one flower stamped out with pink polka dots over green stripes, and the other flower of small pink stripes and green polka dots. The patterns are subtle, but work great together.

2. I used the Elmer's glue to put them together and finished off the flower with a cute button. I also slightly bent up the top flower petals so they stuck out more and added detail.

Now repeat the process 225 times! That's approximately 111 paired flowers of each color! I think this took me about 2 hours total to cut, glue and curl all of them.

Now comes the hard part...Lindsey made her frame for the chandelier (brilliantly if I may say so, and it's my blog so I will!).
And the frame was easy to make.... and then not to easy.
I used floral wire box wreaths because if you unbend the hooks and snap the connecting wires, you get 8 wire rings for less then 3 macrame rings! This was also much, much easier to find, since every store I went to didn't even have macrame rings.

3. Unbend the hooks on the 18" ring and remove the larger outer ring. Then remove the hooks to your 12" wreath and remove the larger outer ring and the innermost ring. Keep the remaining wreath rings for another project.

You should end up with an 18" ring, a 12" ring and a 9" ring.
Now, pull out your hangers and wire cutters.

4. Place the hanger over the 12" ring and measure about an inch over the sides and mark. Cut the hanger to size. If you use needle nose pliers you can unbend/unwind the hangers and straighten them out to get the most out of your materials
. This requires a lot of arm muscle! You need two wires cut for the 12" ring and the 9" ring.
5. Once the hanger is cut to size, use the pliers to bend the wire to a tight hook over the edge so they won't move. Repeat and make an overlapping "X" shape for each ring. This steps helps to assure the rings will keep their shape.

6. Next, move on to the floral wire. Take the 18" ring and twist a small "U" shape (no bigger then your fingernail). Wrap the ends a few times around the ring to secure into place. I used the needle nose pliers to squeeze the wires together and down to hug to rings.

I placed these evenly around the ring using a ruler to keep them straight.
Rough up your rings a little with some sandpaper to prep them for painting.
7. Take your rings outside and spray paint them.
I'm not a big fan of spray paint. I sprayed my rings white and did sort of a bad job of it, but it actually works out by giving it an antique look :) Saves me the trouble of scrubbing it with sandpaper after! Once the rings are dry, bring them inside and set up an area to work in that will hold up your chandelier. I used two antique sewing machines and a yard stick. Lindsey used two step ladders and a yard stick. Really up to what works best for you :)
This is the frustrating part. Connecting the rings and making the frame.
8. I started by cutting 4 pieces of fishing line 12" to give me room to shorten (easier to cut more and take away then cutting new strings). Loop the string through one of the hooks on the medium ring and tie. Then connect the fishing line to the small loops you made on the larger ring. Repeat for all four hooks and loops, ensuring that the rings hang evenly from each other. I tried using a level to help...it didn't help lol. In the end the Medium=>Large fishing line was 8 1/2 inches when done.
9. Hang the smallest ring next, connected to the larger ring. I looped my fishing line through the small cracks in the wrapped around wire "loops". I started with 10" this time and through trial and error, the Large=>Small fishing line ended up being 6"

Again. Make sure they hang evenly. I continued to play with this until the end, it was driving me crazy to reach perfection!
*I had a "DUH" moment through my frustration. Does this shape of the frame look familiar to you? Beside the uncanny resemblance to a UFO! It looks like a lampshade! Next time I try this project, I'm going yard saleing and find a cheap lamp to strip of its fabric and (in theory) instant, stress free frame!Yay! Now the frame is built and it's smooth sailing all the way....
10. Now is the time to place on the ribbon. Grab your ribbon and plug in your glue gun to warm up while you mark the rings. I went around the Medium ring first and marked every 3 inches
*to make things easier and I'm not second guessing myself if the ribbon is spaced evenly apart. I did the same thing to the Large ring.

11. The chandelier top is made up of alternating hanging ribbons and looped ribbons that connect with the smaller ring (see below for example). Test your ribbon and see how low you want it to hang. I let mine fall just a bit for the rounded look. I then cut my hanging ribbon to stop just above the "curve" of my looped ribbon. Count the marks and cut half of the ribbon to "hanging" size and then the other half "loop" size.
My ribbon was cut 8 1/2 inches long.

12. Using your glue gun, place a little bit of glue on one end and wrap over the edge of the marks you made. Then use a little hot glue and wrap the other end around to the small ring. It really makes no difference where you place the other end on the small ring. For the hanging ribbon, just glue to the Medium (top) ring and let the other end hang!
13. For the second level of the chandelier, the ribbon will loop from the large ring to the small ring; test and see how you want it to loop. The entire bottom half of the chandelier is all loops, not hanging and loops like the tops half. I didn't want the ribbon to hang too low. About 2 inches below the upper loops looked best to me.
I cut my bottom level ribbon about 15" long. Hot glue like the upper level over the marks pre-made.

14. Now turn to your punched paper cutouts. I
very lightly marked one upper level ribbon every 3 inches with a dot. Then I hot glued the cutouts to the ribbon alternating the colors. The next ribbon I just "eyed" it and alternated the colors again. By then I had a pattern and went from there.

Continue all the way around the upper level. I did the same process for the lower level.
15. Finish off the chandelier with the remaining ribbon and tie a hanger from each of the top corner hooks.
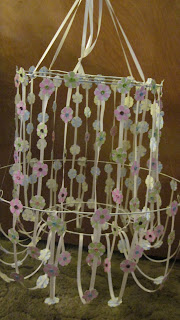 In the end...Ta Da! *Sorry for the bad picture, not nearly as beautiful as Lindseys!
I am really proud of this project and even though it is a lot a work, I could see myself doing this again. It is definitely a great gift for kids,(more for mommies then for the kids) being fun and specifically hot glued to be unique just for them.
I want to make one with stars for my sons room just to hang as decoration.
I think I'll try painting the paper with a glow in the dark paint, so when the lights go out, he can still enjoy it :)
And Now.....Drum roll! Was it worth it all?Pottery Barn's Chandelier: $80.00+shipping
Total cost of My Chandelier project: $40.00!
WIN!


 I took the cupcakes below to a


