Friday, November 26, 2010

Candy Turkeys

How was everyone's Thanksgiving? Mine was great!

I convinced my mother to use my china with dinner and let me set the tables. I never get the opportunity to host a holiday to I am slowly trying to take domination over what I can. I also made all the desserts: Pumpkin pie, apple pie, and my candy turkeys.

I learned how to make these every year since I was 11 years old, and I have made them every year since. They are easy to make and are a great activity for kids.

You can't go wrong with the classic combination of peanut butter and chocolate...

Candy Turkeys

You will need:
Reeses Peanut Butter Cups (one for each turkey)
Nutter Butter Cookies (same)
M&M Mini's (one tube per 5 turkeys)
One tube of Icing
Candy/Indian corn
Platter/Plate


  1. Take a Nutter Butter cookie and swirl some frosting on the bottom half of the cookie. Unwrap a Reese's and place the bottom part on the frosting.
2. Make a rainbow arch of frosting on the top of the Reese's cup.
 
 
 3.Take five Candy Corn and set in the frosting. Flip the turkey over!

4. Squiggle a crooked "T" with a tail shape on the upper half of the cookie, and pipe on a small straight line on the bottom.
 5. Apply green/blue/ or brown M&M's for eyes, orange/yellow for beak and feet, and one red M&M for the waddle, slightly to the side.
 And there you have it! Adorable and delicious turkeys to be sent home as a goody (in case you want all that leftover pie to yourself).


I like the geometrical pattern on the plate

 'Gobble, Gobble' them up as they tend to go fast!
Deuteronomy 8:10 – "When you have eaten and are satisfied, praise the Lord your God for the good land he has given you."

Wednesday, November 24, 2010

Crotchety about Crocheting

I have been trying to teach myself crocheting for the past week and it's been a-slow going...

To have time to sit and watch TV is hard enough to do, but to: sit, concentrate, and count, all with the unending prayer that I don't mess up somewhere and drop a stitch.....ugh! Least to say, I am one of those frustrated learners :)

I am enjoying myself though. I learned how to crochet plastic grocery bags into mats for the homeless, which is a pretty nice way to step into a craft like this. I have been doing that since March, but that only requires a single crochet and chaining. Now I'm branching out...slowly.

But...I'm getting impatient. Like when I started to learn how to play the piano. A few months into it, after learning the basics and lots of practice, you want to start doing the fancy tricks to show off to your friends and family.

Looking online I found some great easy projects that beginners like I can make, all for free. I love free. 

One great "dreaming of what could be" site is:  http://www.favecrafts.com/Crochet. Check it out when you get the chance, it's great. They offer free patterns, discussions boards, tips and sharing.

I'm excited to start making toys for my baby and his friends, Amigurumi!
Adorable Bee

goldfish
Hand puppet scarf!
So enjoy and challenge yourself if you are like me and learning this new skill.

And as always, have fun and make something beautiful.

Tuesday, November 9, 2010

25 days of Christmas: Gifts! #2 Magnets

I know I am not the first person to post this, in fact the news about making your own beaded magnets has been out and about for quite awhile now. But, I wanted to include them in the possible gift category. They are cheap, easy-peasy to make, and can be very personable.
 Things you will need:
Mod Podge (or glue)
Scissors
Clear glass stones ($.89c for 25!)
Magnet roll ($1, cheaper then individual ones)
Pencil
Paintbrush
Newspaper
Scrapbook paper, magazine clippings...(I do not suggest using any photographs, they do not hold up well over time and the colors warp with temperature/chemical changes)

  1. Spread out the newspaper to protect your work surface. Take a stone and place over your paper where there is a nice design that fits into the stone. Trace around the stone lightly and cut out the shape just slightly within the line. I traced one stone 5-10 times on a piece of paper and had very little variation when putting these together, all differences can be trimmed off to fit that particular stone.

Flip your stone over and apply a very small amount of Mod Podge....


Then apply your cut out circle to the back, picture part facing in.


    Check your work and make sure everything looks OK. Use this time to trim the edges of the paper so it is flush against the back of the glass stone. You can also move the paper gently if it is not centered how you would like it.

    Wait about a minute for the glue to set (or longer) and cut a small piece of the magnet off to size. I prefer the magnet roll because it is cheaper and it already has a tacky side that you just peel off and stick. For added security you can hot glue the magnets on, but the adhesive is already really strong.

    And there you have it. Economical and beautiful gifts that fit any budget and style.
    Total cost of each magnet? $.07!


    Use them as a stocking stuffer,
    Gifts to add to homemade cookies and ornaments, 
    Easy gifts to personalize with someones favorite: band, movie, phrase, inside jokes, colors, holidays etc..

    Saturday, November 6, 2010

    25 days of Christmas: Gifts! Homemade Playdough

    Have you ever tried making Homemade Playdough?

    I’ve always heard about how most Preschools always make their own, and my long time friend has been making her own for a long time. I thought this would make a great Christmas gift for little ones ~ it’s so simple, fun, and thrifty!

    Homemade Play-dough Recipe* It is edible!
    • 1 cup Flour
    • 1 cup Water
    • 2 tsp. Cream of Tartar
    • 1/2 cup Salt
    • 1 tbsp. Vegetable Oil
    • Food Coloring/ or Kool-Aid packets (you won't need a scent below if you use Kool-Aid)
    • Vanilla, Orange, Lemon, or Peppermint Extract, Pumpkin Pie Spice...
    1. Mix Together all ingredients except the food coloring in a medium saucepan. You can quarter the recipe and make four different colors of play-dough!
    2. Cook over medium heat, stirring constantly. As soon as the mixture begins to thicken, add in food coloring, mix thoroughly. Mixture will quickly begin clumping and form a solid.
    3. Remove pan from heat to cool, then remove play-dough to cool on wax paper, etc.
    4. Store in freezer ziploc bag and in freezer. Play-dough will keep for years if you want it too.  
    Giving the Gift: Package the play-dough in clean baby food jars/plastic containers (anything airtight really). Paint the lids or make wrappers from stickers to place on the side. Make sure you make a tag to go long with your gift to remind the kids to place the play-dough back in the freezer or it will dry out. If it starts to get dry after several weeks, add a few drops of water and work into play dough to extend it’s shelf life.

    Include some dollar store cookie cutters too for some added fun!
    • Great stocking stuffers'
    • Easy toy to have on hand for kids at Christmas parties or drop in guests

    Saturday, October 30, 2010

    Falling into Simplicity

    Pumpkin Crazy- Take your Creativity Out on a Pumpkin!

    This week has been crazy and the internet at my house has not been cooperating until today. Last minute fun to have with pumpkins in unusual ways. 


    Things you can do with a Gourd, Pumpkin, or Squash.

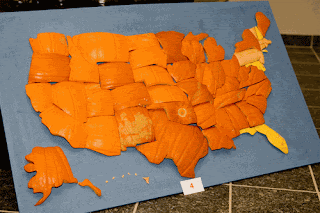
    1. Make a Map!
    2. Make a Birdhouse
    3. Carve them with Free patterns

    Saturday, October 23, 2010

    Pumpkin Crazy- Persimmon-Pumpkin Cookies

    Headed out to our local fruit stand yesterday and everything just looked so good! See for yourself...


    I love this place. They had farm fresh fruits and vegetables. Almonds, walnuts, chestnuts! Gourds and pumpkins galore! We had a lot of fun, we came home with bags of goodies and only spent $10!

    As soon as we came home, I knew I wanted to make cookies. Persimmon cookies. But, not just persimmon cookies, PERSIMMON-PUMPKIN :) Persimmons already have a mild cinnamon flavor to them so pairing with pumpkin seemed ideal.

    These cookies are absolutely delicious! I was really concerned the pumpkin would be overwhelming to the persimmon, but the proportions are just right to make a really mature flavor.

    Persimmon-Pumpkin Cookies

    4 persimmons
    1 small baking pumpkin or 1/2 c of canned pumpkin
    3 tsp baking soda
    4 c flour
    1 tsp (each) cinnamon, ground cloves, ground nutmeg, and salt
    2 eggs
    2 c sugar
    1 c butter
    2 c raisins
    2 c finely chopped walnuts (optional of course)
    1. Pour your raisins into a small pot and just cover with water, give it a quick stir with a spoon to break the raisins apart. Turn to med heat, cover and simmer raisins for 25 min. Turn off the heat and add 1 tsp of baking soda to the water-raisins (adding the soda will make the mixture foam, this is a good sign. The baking soda/cooking helps to re-plump up the raisins for a softer cookie). Stir and let sit until somewhat cooled (approx 1 hour). 
    2. Meanwhile, quarter persimmons and puree until smooth and thick. If using canned pumpkin skip to step 3. If using fresh pumpkin, cut in half, remove seeds (keep seeds to roast!) and lay the pumpkin on a cookie sheet (cut side up). Bake at 350F for 40 min or until tender when touched with a fork. Remove roasted pumpkin from the oven and carefully scoop the pulp away from the skin. Place into a bowl and mash with a potato masher. 
    3. Mix persimmon puree with pumpkin puree (it's OK if fresh pumpkin is still warm), add remaining baking soda and let sit.
    4. In a large mixing bowl, cream butter and sugar until fluffy. Beat in eggs one at a time. Mix in purees. 
    5. Most recipes have you sift, but instead I alternate when adding dry ingredients: 1 c flour, 1 tsp cloves, 1 c flour, 1 tsp nutmeg, 1 c flour, 1 tsp cinnamon, 1 c flour, 1 tsp salt. Works for me, do whatever you are comfortable doing in you're own kitchen.
    6. Drain raisins really well and stir into dough. Stir in nuts.
    7. Drop by rounded teaspoons (the rounder the top, smoother looking the cookie) onto un-greased cookie sheets for 15-17mins or until edges are slightly brown. Let sit 5 min and cool completely on wire racks.
    Makes 36 cookies. 
    Remember to get creative with your pumpkins this week!

    Trunk or Treat

    Halloween is fast approaching. The blog-world is lighting up with decorations, party, and costume ideas. Store isles are stocked with candy, pumpkins, and scary skeletons that stare are you as you walk by. All of America is saying "IT'S CANDY TIME!"

    But, how do you get your candy?
    • Trick or Treating with your kids?
    • "Boo!" Presents from anonymous friends?
    • School or Church Carnivals?
    • Maybe there is just a big bowl at work that you share with your co-workers?
    However you get or giv your sweets, my new favorite tradition is 
    Trunk or Treat.

    Trunk or Treat is a growing trend in schools and churches as it offers minimal work with a big impact. You invite friends and family to park their cars (trucks, motorcycles, RV, stagecoach, whatever!), open their trunks and decorate the vehicles. The decorations and themes are on the participants; and they bring their own candy to hand out!The kids just walk up to the cars like they would houses and ask "Trick or Treat?" Best part is clean up, everyone packs up their car and drives home! Easy right?

    Scary pig car (not ours)
    Consider making your next Halloween Carnival a Trunk or Treat event. All you need are imaginative friends, an empty parking lot, and a little organization to get the word out.

    Something else you can do to make the event even more interesting is to have a contest for best car, best costumes etc...The church I attend has a best car award. The award is a simple Dollar Store trophy with a toy car glued on top with it's trunk open.

    I really want that trophy.


    Last year, Mr. Beautiful and I went with a Grecian theme and I really thought we were going to win, but we didn't. We had a small canopy over our car, with drapes and chairs, full costumes, the whole works!
    Halloween 2009
    This year we're going as nerds. The car is going to be covered in science posters, books etc... and we're going to bring "science" stuff to play with and for kids to play with when they come up to the car. It's a very wallet friendly theme. We're also giving away mini tubs of play dough and coloring pages instead of candy.

    That's what I'm going to be doing. What are you doing on Halloween?

    Pumpkin Crazy- Pumpkin Cornbread

    It's Fall here in California, least my yard and the weather is telling me so. Halloween is just a week away and I'm excited to start making goodies for teachers, friends, and family.

    I grew my own pumpkins this year and I have to say it was so much fun. My nieces and my son loved to watch them grow in the yard. To turn from seed, to flower, to gourd, to our big happy friend on the porch (well almost, I haven't carved him yet) was a wonderful experience I am going to be doing every year. I plan on becoming a seed saver (more on this later).

    I love pumpkins over all. I love the variety of colors, variety of shapes and sizes, the feel and taste of them :) You could say I am a bit pumpkin crazy!

    Pumpkins are my decoration of choice for fall. They serve as candle sticks, vases, or luminaries. They provide food and nutrients that make your skin healthy and hair shine. Huddled together or standing alone, pumpkins are one of the hardest working Cucerbita Pepo I have ever seen.


    In honor of our rubbery skinned friend I am posting a week of pumpkin filled recipes, crafts and projects until Halloween.

    I encourage you to try new and interesting ways of using pumpkin in your life.


    Day 1- Pumpkin Cornbread

    1 c flour
    3/4 c yellow cornmeal
    1 tsp baking soda
    1 tsp baking powder
    2 eggs
    1/4 c vegetable oil or unsweetened applesauce
    1/4 c honey
    1 c pureed pumpkin
    1 c buttermilk
    1. Mix cornmeal, baking soda and powder together. Make a well in the center and add the remaining ingredients. Let mixture sit 10 minutes, while you pre-heat the oven (this step softens the cornmeal).
    2. Pre-heat the oven to 425F. Pour into a 9 in square pan and bake 20-25 min, or until bread starts to pull away from the pan. 
    3. Serve warm with Pumpkin-Turkey chili or share with good company. 
    My pumpkin baby 2009

    Sunday, October 10, 2010

    Intro to Computer Graphics

    Hi Blogging world.

    I decided for this post to share with you something that I am taking a class in right now: Computer Graphics.

    Now, honestly I really wanted to take this class to raise my GPA (you know, easy A). I also wanted it to be more like making cute graphics for stickers and banners and such; but, I found myself really challenged to delve deeper and create some really beautiful pieces of art.

    Easy abstracts
    The software we are using is called Bryce. It is completely free. So anyone can create wonderful things. There are lots of tips and tricks to use when creating your "world," but anyone can pick it up.

    For now, I'm going to start by suggesting you download the link, either version 5.5 or 7 are great programs. Any post I make will be made with the 5.5 version since 7 still has a lot of kinks being worked out on it.

    More complex architecture
    I will try my best to share with you the education I am paying for :) And if I confuse you, then you can always check out the Bryce tutorials anytime. Here's hoping!

    Friday, October 8, 2010

    Spice Shortbread Sticks (try saying that 5x fast!)

    I found the recipe for these cookies in an old Pillsbury Cookies and Bars book I found at my moms. I thought I would try them out, I haven't made these before and look yummy. I was in an Autumn type of mood and wanted something warm and "dunkable" for my morning coffee or apple cider.

    I don't post everything I make, especially if I didn't make it up, but these were so darn good and easy I had to share. They are really like a comfort food to me, I eat one bite and I feel all warm and cozy.
    These are great mailed Christmas cookies

    Sugar and Spice Shortbread Sticks
    This recipe has been modified to suit my baking process

    Cookies
    3/4c brown sugar
    1 c unsalted butter, softened
    1 tsp vanilla
    1 egg
    2 3/4 c all purpose flour
    3/4 tsp apple pie spice (OR 1/2 tsp of cinnamon, 1/8 tsp each of ground cloves and nutmeg)
    Haha, looks professional and wasn't even staged!

    1. In a large bowl, combine sugar and butter, cream. Add vanilla and the egg, mix until light and fluffy. Add flour and spices, mix until a dough forms. Wrap in plastic wrap; refrigerate about an hour.
    2. Pre-heat oven to 350F. Take a piece of wax paper and lay on a flat surface, lightly flour. Cut dough in half and roll out on half to a 12x6- inch rectangle. Use a 1-inch ruler, and rock slightly to the right to make impressions in the dough all the way across. Cut the dough down the impression lines with the back of a knife. (Cut the cookies in half lengthwise to get 3-inch cookies instead of 6-inches if you'd like) 
    3. For a well shaped stick, use the flat side of the ruler to straighten the sides of the dough. Use it as a guide to cut the rectangle neatly, in half, or to make sharp edges. Dip a spatula in flour and carefully place sticks 1/2 inch apart on ungreased cookie sheet.
    4. Bake for 12-15 mins or until edges or slightly light golden brown. Immediately remove from cookie sheet and cool on wire racks completely. 
    Glaze
    1 1/2 c powdered sugar
    1/4 tsp cinnamon, 1/16 both cloves and nutmeg, 1/2 tsp chai vanilla spice (optional)
    3 tbl apple juice or water

    1. When cookies are completely cooled. Blend all glaze ingredients together until smooth and you reach a desired glaze consistency (runny, think like molasses). Spread glaze on tops of cookies. Let glaze stand and set before storing.
    This is cleaned out candle jar

    Under the Sea Salad

    I can't believe I haven't shared this recipe with everyone yet! It is the most popular dish I have ever taken to a potluck and friends are e-mailing me all the time asking "what did you call that delicious Jell-o dish again?"

    Don't be fooled by it's strange appearance, this Jell-o salad is sweet and refreshing on hot days. Its strange look and layers have people asking you, "What is this?" But, after one bite I can guarantee they'll be asking for the recipe or headed for seconds!


    Under the Sea Salad  
    The salad is supposed to look like the ocean. Green waters underneath, shells with "pearls" and foam waves on top.

    2 6oz boxes of Lime Green Jell-o (Sugar Free is OK)
    2 boxes of cream cheese
    1 Lg can of Pear Halves
    1 jar of maraschino cherries
    Refrigerator room, 4 c measuring bowl, sheet cake pan, electric mixer

    I ate the cherry out of this one before the picture :)
    1. Take cream cheese out to let set to room temperature. Make one box of Jell-o according to the package, making sure the Jell-o is completely dissolved. Pour into a 10"x14"x1.5" cake pan (if the pan is metal it will keep the Jell-o colder longer).
    2. Open can of pears and reserve juice (approx 1-1.5c), gently place one cherry in the pit of each pear and place face down in the warm Jell-o. 
    3. Place in the fridge and allow to firm up 3 hours, you want the Jell-o to stand up, but still be a bit tacky on the top.
    4. In a large bowl or stand up mixer, place in both cream cheese blocks. Mix a few seconds with beaters or the whisk attachment (I do not recommend that you do any of the mixing by hand, as you will end up with chunks of cream cheese and not the nice look you'd want). Add the pear juice, whisk. Mix your remaining Jell-o box with 2 cups of hot water and dissolve well, then slowly pour into the cream cheese mixture. Whisk or beat the liquid until the cream cheese breaks up into little circles and starts to look "foamy," about 2 minutes.
    5. Pour mixture over the pre-made Jell-o and place back in the fridge. Let salad set for about 4 hours. 
    6. Cut into 3 inch squares and serve!
    See the "sea and foam"?

    *Note: If you decide that you don't want to use Lime flavor, I highly suggest you try this with other strong flavors that would pair well with cream cheese and fruit. I have tried this recipe with Strawberry Jell-o and it was really good too. But, I usually stay pure and true to the Lime. 

    I like my "sea" green.

    Saturday, September 25, 2010

    Reading is Power!....and Offensive?

    It's been a long time folks, sorry I haven't been posting. I traveled around a bit and then got caught up in a nasty cold for a few days. It's is taking it's sweet time leaving my system though....

    At any rate, I found the motivation to blog about something that is near and dear to my family: Banned Books (against it, not for the banning). I don't want to toot a horn to my family, but we are pretty active lifelong learners. One of the touchy subjects among us is banning/burning books for whatever reasons people choose is their logical decision.

    To celebrate banned books, we in the U.S. have a week dedicated, this year it's November 25th-Oct 2nd.

    One of the big moving themes in my life the past few months in the strong importance we still place on reading.
    • With the growing technology, magazines subscriptions are still growing in households
    • Library memberships are rising with the lowering of the economy and people are choosing to borrow then buy books/movies and we can see a more fluid movement of idea exchange.
    • Some of my friends are rubbing their Kindles in my face going "neaner- neaner- neaner!"
    • As a substitute teacher and a family that works in schools, I am aware of the importance of testing reading skills among children.
    • Hard copies of the newspaper may be declining, but e-papers are on the rise
    • Blog readers and writers are growing everyday, reading and sharing
    • I feel out of place among my colleagues at school and I felt the urge to read up on various topics to keep up with the changing discoveries and theories
    • much more....
    Religious, Philosophical, or Political: the three things you do not talk about at the dinner table in case you may offend someone. This censorship of ourselves has stretched and grown opinions and forced itself into other peoples lives without them even realizing. Take a look at the links to see if your favorite has made the list.

    Yahoo's List of Uncomommonly known banned books
    List of Banned Books A-I, with link to J-Z

    The point of this blog isn't to move and shake you, to frustrate or enrage you. I just wanted you to recognize dear readers that you to already are fighting the censorship committees and easily offended people's of this world.

    By reading: blogs, papers, transcripts, books, plays, novels, sermons, stories, literotica, magazines, encyclopedias, manuscripts, wills, westerns, testaments, confessions, spiritual texts, contracts, decrees, speeches, e-books, e-zines, sonnets, references, fiction, non-fiction, fantasy, biographies, auto-biographies, essays, history, love letters, memos, e-mails, and even "Big John's Bathroom Readers" you are gaining ideas and information that you didn't know before.

    However offensive something may be, there is no experience that should be censored from the world. Life happens and we can learn from others. We can become life long learners as long as there is no one deciding what is best for us.

    Let people decide for themselves what is offensive.

    And to visit the old rebuttal: If you don't like it, don't look at it/read it/eat it....

    Sunday, September 5, 2010

    Lime-Garlic Kabobs with Paprika Corn

    Few nights ago I really wanted to make something different but easy. I had to use the chicken I had taken out the night before and some of the left over ingredients in my fridge since it's almost shopping day.


    I still had some key limes left over from making a pie and cupcakes (I got a lot for only $2!). So, I decided what the hey, lets make lime kabobs (easy, different) with some garlic (to cut the tangy-ness and use the last bit that was in my fridge). 


    These were a snap to make and served next to paprika-chili corn, they are delicious!

    Make the Marinade

    12 key limes juiced, 1/2 c lime juice
    2 tbl vegetable oil (veg oil burns less then olive oil)
    1 tsp soy sauce
    2 tsp apple juice
    2 tbl minced garlic

    Take 2-3 chicken breasts and cut into 1" cubes the best you can. Place chicken into a seal-able plastic bag. Pour in marinade ingredients and seal. Wiggle bag around until combined and refrigerate for 30 min to 1 hour.

    Prepare Kabob Sticks

    While marinade is in the fridge, if you are using wooden skewers you have to soak them in water for at least 30 mins before use or they will burn. I used a cookie sheet and added just enough water to cover the sticks.

    After an hour, Start with the corn.

    4 ears of corn, shucked and washed
    1/2 tsp paprika or smoked paprika
    1/4 tsp chili flakes
    1/2 c butter, room temp
    aluminum foil 

    Pre-heat oven to 350F. Place butter and spices in a bowl, mix well. Take one ear of corn at a time and place on a sheet of foil, scoop up 1/4 of the butter mix and coat all over the ear. Wrap in foil. Repeat with remaining corn. Place directly on oven rack, set timer for 15 mins. Meanwhile begin making kabobs.

    Spray a cookie sheet/ jelly roll pan generously with Pam OR cover with foil,  set aside.

    Use two kinds of veggies with your kabobs to add color and interest as well as maximize your vitamin intake. I used easy summer veggies with my kabobs: zucchini and yellow squash.

    Cut up the veggies about 1", or into 1/4 wedges so they are about the same size as the chicken (this assures even cooking on all sides). Bring out the chicken. Drain the kabob sticks water and begin skewering, start with: chicken, veggie, chicken, alternate veggie, chicken, veggie. I usually top my kabobs with a cherry tomato to add a pop of color and I love roasted tomatoes!

    Skewer until all the chicken and veggies have been used, this should make approximately 12 kabobs. I drizzled the remaining marinate over the kabobs. 

    This entire process should take about 15 mins, wait for your corn timer to go off.

    When it does, add the kabobs to the oven and turn the corn 180 degrees.

    Set the timer for 7 mins. Rotate the kabobs 1/3 of the way, set the timer again 7 mins and rotate again.

    Let kabobs and corn cook for another 5 minutes. (Max time for kabobs: 20-25 mins)

    Remove corn and kabobs at the same time (I love meals that finish at the same time), plate and serve!


    The kabobs have (to me) an intense tang to it, but then again I don't like sour foods. Nonetheless, they were very good and the corn...OMG. I will make this corn at least once a month now. You can't see the little flakes of paprika in this pic, but it looks so yummy on the corn and contrasts beautifully.

    Mr. Beautiful's opinion: he ate all the kabobs! All 9 of them!

    What I like about this meal the most; Clean up: throw foil away!

    Beautiful!

    Activity Board (Part One) Chalkboard Paint

    I bought a table at IKEA, and it served me well. But months of putting to many heavy things on the table, dragging it around and I ended up Oops! breaking the cheap tables legs. 

    I tried to fix the problems, but I had to face facts and give up on it continuing to being a table. 

    BUT, that doesn't mean it can live on to be something else :)

    My $20 table, farewell!


    I took the table apart and kept everything. But the part I'm focusing on is the second shelf. It's solid, large piece of wood: 46"x26 1/2"

     
    A can of chalkboard paint sprayed to one side, and a few hours later....I have a HUGE chalkboard for my son to play with.

    I think he likes it.

    Messy Feet!


    There are a lot of options now a days when painting an activity board or message board for the house.

    • Chalkboard paint comes in different colors, you can have it made for you or buy the kits and mix it at home. I've always love the classic black. Plus the left over paint be used in other places in the house.

    Check out Frugal with a Flourish's 9 Ways to Use Chalkboard Paint. I love the gardening spoons!

    • I could and (now that I think about it) SHOULD have painted magnetic paint on the board before I painted the chalkboard paint so it would have doubled as a work board.

    • There is whiteboard paint, but I don't trust anyone under the age of 10 with markers :)

    I won't tell you what I'm doing on the other side of the board, but you're welcome to guess what it is.